• Skip to secondary menu
  • Skip to main content
  • Skip to primary sidebar
  • Skip to footer
  • Home
  • About Me
    • Privacy Policy
    • Disclaimer, Legal and Media Kit
  • Blog
  • Contact me

A Net in Time

Curriculum and book reviews, faith, homeschooling and more!

  • Art
  • Blogging Helps
  • Faith
  • Homeschooling
  • Poetry
  • Recipes
  • Reviews
  • Writing

Engineering

Art Book: Duct Tape Engineer

November 29, 2017 By Annette1 2 Comments

I know you have already gotten a bit of a preview of the fact that my boy likes to build with duct tape. I KNOW I have shown you pictures of his knight’s outfit.  He is my duct tape engineer!   So when the chance came to review “Duct Tape Engineer” I thought WOW…this is a book made for me and my lad.

The Duct Tape Engineer: The Book of Big, Bigger and Epic Duct Tape Projects is filled with things that the lad and I want to build, even dad poked his head in and said “neat idea”.  We haven’t, at this point, actually built any of the items in the book to their full size, but we did build some mini versions of them.  ๐Ÿ™‚

 What can you build?   Included are plans for: 

14 different builds to delight you, inspire your creativity, and.. save you money.  Why spend 1000’s on a kayak, when you can build your own using plastic sheeting, duct tape and pvc pipe?  

Alternatively, you could do the math and downsize them and make doll furniture or child-sized seating.   All plans are for the adult person, so just doing the math and downsizing gets you inexpensive furniture that you can grow as your children do, or that can delight your offspring with doll furniture that they can pretty up to suit their tastes (or the preferences of their doll).  

 
Each project includes a set of clear ingredients.  I love that not only do you receive a written set, but are given a visual as well.

 Instructions are as well done as the needed supplies. Text along with pictures. Everything is so clearly spelled out it makes each project a dream to build.

 What did we make with it?
Nothing full sized….but we did make doll furniture using the plans just downsizing. 

 As you can see they also make excellent small polymer pet furniture as well!  ๐Ÿ™‚

My thoughts:
This is a fantastic book.  If you have a duct tape builder in your house, get this book.  If you have a creative child, who is also good at doing math (or needs to practice it) and likes to build with duct tape…get this book.  It’s fun and helps you see things that you too could create with duct tape.   This a goodly thing to do!  ๐Ÿ™‚ 

 Duct Tape Engineer: The book of big, bigger, and epic duct tape projects
Lance Akiyama
Rockport
160 pages
softcover with built in fly
Crafting, duct tape, create, resource, math, engineering

Reviewed for: Quarto Group

Where can you find it?

Amazon.com: Duct Tape Engineer.
Amazon.ca: Duct Tape Engineer. 

This post may contain affiliate links – using affiliate links from A Net in Time helps fuel this blog and our homeschool – thank you! ยฉ2006-2017 A Net In Time. All rights reserved. All text, photographs, artwork, and other content may not be reproduced or transmitted in any form without the written consent of the author. A Net In Time . We are a participant in the Amazon Services LLC Associates Program, an affiliate advertising program designed to provide a means for us to earn fees by linking to Amazon.com and affiliated sites

Filed Under: Art, Reviews, Uncategorized Tagged With: Art Books, Book Review, Engineering, homeschool, Review, Science, STEM

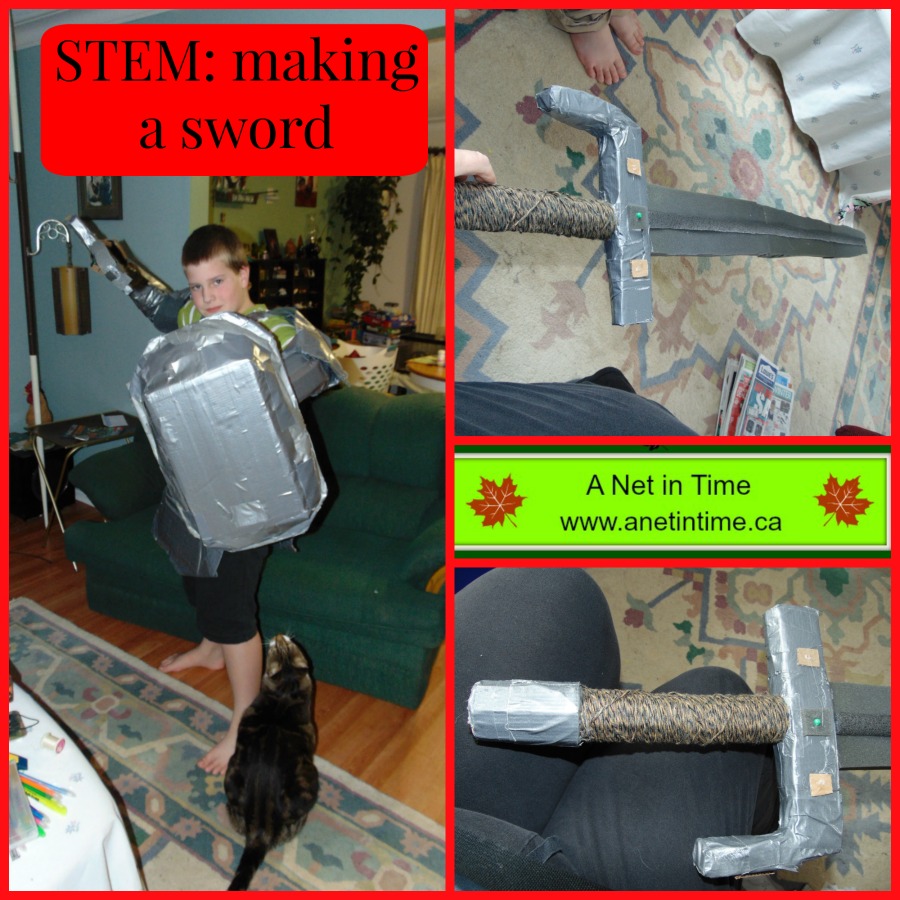
STEM: The Making of a Sword

February 17, 2017 By Annette1 12 Comments

What does cardboard, duct tape, a dowel and a ball of yarn have to do with each other?

It’s a weapon for an 11 year old boy that’s what it is.   My son has been making or using swords for a very long time.   As he gets older they are getting more elaborate with better details.  He has a weapons book that is frequently a source of inspiration.

Take one dowel, add some cardboard and wrap it with yarn.  Judicious use of duct tape is must.

Make sure you craft your cardboard carefully so you can make a good hilt.  Protecting one’s hand while swinging a sword is vitally important.   A good grip equally so.

Take time to form your foam to make your sword blade.  Think enough to provide cushioning, thing enough to not look horrible. 

Safety is very important…no accidental injuries needed.

After applying the foam to either side of the dowel there was a space in either side that just didn’t look right.  Here is where some thin foam came into play.

And of course, no sword is complete without the knight to go with it eh?

He used to have boots and leg protectors but they just proved a pain to deal with so he discarded them.  His shield can take quite a beating. His gauntlets provide a good range of motion and give him more protection then you’d think.  

The sword, unless swung with determined force, doesn’t hurt when it hits, but is long enough that we need to be mindful of lamps, candles and overhead lights.  ๐Ÿ™‚  I’m looking forward to the spring when I can use my scimitar the lad is going to make me, against the lad’s sword.  ๐Ÿ™‚

The Lad is getting practical experience in how difficult it would be for students of the knightly arts to control what their sword was doing.    He’s built a sheath for it (needs a bit of fine tuning so no pictures allowed).

I love how my lad will spend hours creating, changing, adding, and learning about the armour and weapons of old.   Doing STEM and not even realizing it.   AND it works and works well.  He’s due for a refit of his chest-plate etc and he’s gone through a growth spurt and is finding it just a tad bit tight now….  

So tell me… would you want to face this young warrior in battle?? 

If my son has peaked your interest, some books that might appeal.  Affiliate links used to help my family without cost to you.
 

Filed Under: Uncategorized Tagged With: child-led learning, Engineering, history, homeschool, Science, STEM

STEM: PopCan Robot

January 20, 2017 By Annette1 6 Comments

Fridays are our do it differently days, learning happens we just have fun doing everything differently.   One of the things we do is do some sort of STEM activity.

We had SO MUCH FUN putting this fellow together.  OH MY OH MY.

To make this fellow you need the 4M kit and one popcan…that’s it.

Add to that some laughs.
Lots of questions.
Scissors.
and a wish for a coverup for a can.

On to the joy and wonder of making a tin can robot.

One of the things I like about 4M kits is they are very clear about what the kit does and does not contain.   In this case we need to supply two batteries and one popcan.

The box is a nice size to store on a shelf, recyclable, and easy to open. .. HEY>> it’s good to know that stuff.. I’ve gotten kits before that opening them is a pain in the … well you know… but easy to open bags with all parts conveniently grouped.

The back of the box clearly indicates the parts contained which is a great help to know if it’s age appropriate or not.

OH.. I almost forgot… we did need to supply our own screwdriver.

 As you can see the instructions are clearly labeled, with colour markers to help with placement and understanding.   The lad found it very easy to understand and rarely needed my assistance.    It’s great to see his confidence building more all the time.

 This fellow currently resides in my son’s room and makes regular circuits up and down the floor during our night time reading.

You gotta admit, he is rather cute don’t you think?   ๐Ÿ™‚

As you can see.. he works!  We learned he works on smooth floors best, with couches working as well… but the carpet… never got him to like that.  We do wonder, what if we put traction on the wheels.. would that work better but we haven’t test that theorem out yet.


And the cat is well….unimpressed.

Others in this series
Salt Water Spider.
Solar Oven.
Sand Art.
Spy Case.
Practical Math.
Light Up Planetarium.
PopCan Robot.

Filed Under: Uncategorized Tagged With: Do It Yourself, Engineering, hands-on learning, homeschool, math, Science, STEM

Water Clock

May 20, 2012 By Annette1 Leave a Comment

Doesn’t this sound like something fun to try?  
I need a stop watch first though….

GIVE IT
A TRY #1: WATER CLOCK

The ancient Babylonians were some of
the first people to keep time. Sundials and water clocks were frequently
used to keep up with the time of day. We know this from information that
archaeologists have learned from clay tablets found in the area. The water
clock allowed people to know how much time had passed even in the middle of
the night. You can make your own water clock to get an understanding of how
ancient people knew what the time was.

Items Needed:

  • Medium to large glass jar
  • Paper or plastic cup
  • Embroidery needle or stick pen
  • Permanent black marker
  • Stopwatch

Directions:

First, use the stick pen to poke a
small hole in the bottom of the cup. After this, fill the cup with water,
and make sure that the water drips out at a steady rate. With the marker,
make a fill line inside the cup so that you have a measured amount of water
each time.

Next, place the cup into the mouth of the jar. Fill
the cup with water to the fill line and immediately start your stopwatch.
Make lines with the marker on the jar at predetermined intervals. Note that
the water will drip more quickly at first due to water pressure; therefore,
your lines should get closer together as more time passes. Remember not to
let the water in the cup run out.

By looking at the jar of water
and seeing how much water has dripped into it, you can tell how much time
has passed. Enjoy this old way of telling time!

Filed Under: Uncategorized Tagged With: Engineering, Science

Our Bridges Work

April 13, 2011 By Annette1 Leave a Comment

I went to the Goodwill Book Store in London and picked up a whole whack of books. One of them was this book by Etta Kaner called Bridges.

I started reading through it with the lad while he was digging in his dinosaur egg. We got intrigued…. Being intrigued in our household means let’s experiment and see what happens.

Chapter One is on Beam Bridges.

HAH! Easy enough to experiment with these! And besides…the book clearly lays out the experiments one can do.

We started with Page 7, build a beam bridge. All we needed was two bricks, paper (used cardstock) and plasticine (or some other such modelling clay).

easy enough…set up your bricks. Place a piece of cardstock over it. How many plasticine bricks will it hold? We learned it ALL depends on where you place them. Smack dab in the middle…Three MAX. BUT if you put some on either end before you put them in the middle it will hold more. SEE …..

not anchored

anchored

Then the book said try doubling the paper, and folding the paper in different ways. So we doubled the paper.. it held a bit more than twice as much weight without being anchored (about 8), and when it was anchored we could put all the made bricks (about 15) on top.

We made a waffle bridge… and WOW!! that just amazed us. We put ALL the plasticine we had on top and it didn’t break! One end crumpled a bit but that we think, was due to mommy’s poor folding job at that end.

and angry black bomb bird could sit underneath quite safely. ๐Ÿ™‚

Then we moved on to page 12 as I just wasn’t quite sure how to do the in-between pages and decided thinking on those a bit would be a good thing.

So we tested out different types of columns. Square, Triangle and Rectangle

we started with two DVD’s
we added more.
the triangle really started to quiver and shake

we managed to get one more book on top
and then the square one gave one unfortunately falling
into the circle one.

We went for a walk afterwards and discovered there are columns everywhere…even the trees are columns! We decided that was very smart of God to make the trees grow in the strongest shape. Circular columns were by far the most common column that we found, though most that most porch railings use square columns which didn’t make any sense to the lad. “how will these hold up a person mommy? they are the wrong shape! they are square! they should be circled!”

I had no answer for him….do any of you???

Filed Under: Uncategorized Tagged With: Engineering

What we Learned today – April 12, 2011

April 12, 2011 By Annette1 Leave a Comment

me – “Hey Son, what do you think we should have for breakfast this morning?”

the lad – “IRISH PANCAKES!” “you got to remember mommy, I like Irish pancakes”. (this said with a very earnest face)

So this is what we made (i cut the recipe in half)

Here is an easy way to make thin pancakes:

4 oz/ 125g/ 1 cup plain flour
pinch of salt
2 eggs
1/2 pt/ 250ml/ 1 cup milk
1 tbsp melted butter

Put all the ingredients in a blender and blend for about 30 seconds. The batter should then be allowed to stand for 30 minutes in a cool place. Heat a small pan over a medium heat. Grease with a little butter and wipe out with kitchen paper. Fry about 2 tbsp of batter at a time, swirling to cover the base of the pan. Keep them thin and there will be no need to turn. Serve rolled up with sugar. (we roll with cinnamon sugar)

Today we have a simple plan. Have breakfast, break open a dinosaur egg (purchased from dollar store) and talk about dinosaurs, paleontology, archaeology while doing so. Start our review of Mother’s Day for DNG, clean the kitchen, play outside, and see what else we can fit in. ๐Ÿ™‚

But for now…BREAKFAST! ๐Ÿ™‚

we enjoyed our breakfast and then dug up two dinosaurs.
The lad had dug up this one yesterday at gramma’s: stegosaurus
and today he dug up: Dilophasaurus

and I dug up a Parasaurolophus

Then we had fun letting our imaginary bunnies dig them up as well. One was the digger (archaeologist) and the other was the puzzler (Paleontologist) who put the dinosaurs together.

looked at doing this.

We never did do the mother’s day unit study, but we did do other things… like we read books and did some experiments on bridges. I’ll be posting pictures (go here for those)!

Filed Under: Uncategorized Tagged With: Animals, Dinosaurs, Engineering, recipes, Science

  • « Go to Previous Page
  • Page 1
  • Page 2
  • Page 3

Primary Sidebar

ABOUT ME

I am centered by the love of God and family. Smiles are brought about being a Writer, Poet, Hiker and reader. Growth occurs as I educate my son, raise him up in the fear of the Lord, love up on my critters and live as a pastor’s wife.

Want to Stay Informed?

Subscribe and I’ll shoot you an email once a week.


Thank you!

You have successfully joined our subscriber list.


Recent Posts

  • A Shift in Perspective
  • Affording Emergencies
  • Obey God Not Man
  • Just a Phase
  • What Route Should I Take?

Recent Comments

  • Annette1 on A Shift in Perspective
  • Annette1 on A Shift in Perspective
  • Sandra K. Stein on A Shift in Perspective
  • Tami on A Shift in Perspective
  • Annette1 on A Shift in Perspective

Archives

Categories

  • Art
  • Art Books
  • Blogging Helps
  • Faith
  • Homeschooling
  • Poetry
  • Recipes
  • Reviews
  • Uncategorized
  • Writing

Footer

Amazon Affiliate information

A Net in Time is a participant in the Amazon Services LLC Associates Program, an affiliate advertising program designed to provide a means for us to earn fees by linking to Amazon.com and affiliated sites

Tinker Crate Affiliate

Copyright © 2026 A Net In Time. All rights reserved. All text, photographs, artwork, and other content may not be reproduced or transmitted in any form without the written consent of the author. A Net In Time ยท Lifestyle Pro - Child Theme On Genesis Framework ยท WordPress ยท Log in