• Skip to secondary menu
  • Skip to main content
  • Skip to primary sidebar
  • Skip to footer
  • Home
  • About Me
    • Privacy Policy
    • Disclaimer, Legal and Media Kit
  • Blog
  • Contact me

A Net in Time

Curriculum and book reviews, faith, homeschooling and more!

  • Art
  • Blogging Helps
  • Faith
  • Homeschooling
  • Poetry
  • Recipes
  • Reviews
  • Writing

recipes

Recipe: Easy Meatloaf

May 23, 2017 By Annette1 2 Comments

Tonight hubby made supper, he was all.. hmm.. I don’t know what to make so I suggested meatloaf and he agreed it was a great idea. 🙂 He found this recipe and modified as per some of the suggestions in the comments. 

Ingredients

900 grams (almost two pounds) ground beef
2 egg
1 cup milk
1 cup dried bread crumbs
salt and pepper to taste
1.5 tbsp of worchestershire sauce
1 onion, chopped
3 tsp Minced garlic 

2 tablespoons brown sugar
A good squirt of ketchup and yellow mustard

Sprinkle of Parmesan Cheese on top

Directions
Preheat oven to 350 degrees F (175 degrees C).
In a large bowl, combine the beef, egg, milk, worchestershire sauce and bread crumbs. Season with salt and pepper to taste.   Fry up the onion and garlic together, add to the meat mixture.
Place in a lightly greased 5×9 inch loaf pan.
In a separate small bowl, combine the brown sugar, mustard and ketchup. Mix well and pour over the meatloaf.
Bake at 350 degrees F (175 degrees C) for 1 hour.

Results:
Everyone loved it and said “Dad should make this again”.  🙂
We served with mashed potatoes and peas. 

This post may contain affiliate links – using affiliate links from A Net in Time helps fuel this blog and our homeschool – thank you!

©2006-2017 A Net In Time. All rights reserved. All text, photographs, artwork, and other content may not be reproduced or transmitted in any form without the written consent of the author. A Net In Time/

Filed Under: Uncategorized Tagged With: recipes

Recipe: Cherry Jello Cheesecake

May 16, 2017 By Annette1 10 Comments

Hubby made this delightful dessert for supper tonight.  I’m not a big cheesecake person, but for some reason I like it when he makes it like this. Go figure.  🙂   Anyways, give it a whirl, I’m sure you’ll like it too!

Ingredients and Instructions:

One package sugar free jello
1 boiling cup water.
Dissolve the jello in the water.
Cut in one package cream cheese, just keep smoothing it out until it a creamy mixture.  Do not whip with beaters as you don’t want a bunch of air bubbles in it.
Place in a graham cracker pie crust.
Chill

Optional:
Before serving cover with pie filling (we used cherry, about 1/2 a can)..

document.write(”);

This post may contain affiliate links – using affiliate links from A Net in Time helps fuel this blog and our homeschool – thank you!

©2006-2017 A Net In Time. All rights reserved. All text, photographs, artwork, and other content may not be reproduced or transmitted in any form without the written consent of the author. A Net In Time/

Filed Under: Uncategorized Tagged With: recipes

Recipe: Banana Apricot Muffins

May 9, 2017 By Annette1 2 Comments

This is a recipe of my own creation!  Imagine that!   I looked at a few recipes for bananas and apricots and too many had ingredients I didn’t have in the house.   So I decided to try my own hand at it and to my delight they turned out well. 🙂

Ingredients
2 eggs, beaten
2 ripe bananas, mashed 
1/2 cup apricots, cut into small pieces
1/4 cup oil

2 cups flour
1 tsp salt
3/4 cup white sugar
1 tsp baking soda

Directions
1. Mix first four ingredients together in a separate bowl.
2. Mix last four ingredients together in a separate bowl.
3. Make a well in the dry ingredients, then add the wet ingredients, stir until decently combined but not completely.
4. Makes 12 muffins cooked in a 350 oven for 20 to 25 minutes. 

Our Thoughts: 
 Mine – YAY!!   They turned out!
Justin – They’re good mom!
Hubby – Good muffins, good job hun.

document.write(”);

This post may contain affiliate links – using affiliate links from A Net in Time helps fuel this blog and our homeschool – thank you!

©2006-2017 A Net In Time. All rights reserved. All text, photographs, artwork, and other content may not be reproduced or transmitted in any form without the written consent of the author. A Net In Time/

Filed Under: Uncategorized Tagged With: hands-on learning, recipes

Recipe: Rice Cheese balls or Arancini

May 2, 2017 By Annette1 4 Comments

 So the other day I had cooked up a bunch of rice cause I wanted to make some rice pudding.  I over estimated how much I would need (what can I say… I can do the math but my cold-fogged head messed up).  Anyways, I had a whack of rice and wanted to lessen the amount of leftovers.  (ever been there??).

I found Five Easy Recipes that use leftover rice and made what I call rice cheese balls, but what they call Arancini.

Ingredients:

  • 2 cups cooked white rice, cooled
  • ½ cup grated Parmesan
  • 1 egg
  • 8 small cubes fresh mozzarella – if using store bought mozzarella let it sit out for a bit to get warm and soft.
  • 2 eggs
  • 1 cup Italian-style breadcrumbs
  • Oil, for frying
  • 1 cup marinara sauce (didn’t use)

Directions:
1. Place a large pot over medium heat, adding enough vegetable oil to rise 4 inches in the pot.

2. Combine the rice, Parmesan, and 1 egg in a medium bowl. Use your
hands to thoroughly combine the mixture. 
3. Whisk together the remaining 2 eggs in a small bowl.
4. Measure the breadcrumbs into a small bowl.  I did not need the 1 cup, could probably get away with 1/2 cup.
5. Take a small portion of the
mixture, forming a ball around a cube of mozzarella. 
6. Dip each arancini in the eggs and then in the
breadcrumbs, shaking off any excess.  NOTE: to do this I placed each round on a spoon and then spooned the egg over top of it, turning as necessary.  DO NOT dip them.. they will completely fall apart on you.  Then roll them in breadcrumbs.
7. Once the oil reaches 375 degrees
Fahrenheit, add 2 or 3 of the breaded arancini to the pot, frying them
until golden brown and cooked throughout.

8. Use a slotted spoon to remove the fried arancini from the pot and
transfer them to a paper towel-lined plate. Immediately salt the
arancini. Repeat the frying process with the remaining arancini.  I did not salt them but I dislike excess salt, hubby found it unnecessary, your tastes may vary.

If you want, dip them in the marinara sauce.
If you are like hubby – seafood sauce is really great with them, or ketchup, or dijon mustard.  Threaten to scarf down all nine balls lovely wife made.  🙂
If you are like the lad and mom – no sauce necessary..just eat up and enjoy and look for seconds.  🙂

They are best served warm.

document.write(”);

This post may contain affiliate links – using affiliate links from A Net in Time helps fuel this blog and our homeschool – thank you!

©2006-2017 A Net In Time. All rights reserved. All text, photographs, artwork, and other content may not be reproduced or transmitted in any form without the written consent of the author. A Net In Time/

Filed Under: Uncategorized Tagged With: hands-on learning, recipes

Recipe: Sweet Rolls

April 25, 2017 By Annette1 2 Comments

 I had never made sweet rolls before so I thought I’d give it a whirl.  I chose this recipe as it looked quite doable in the course of one day and some looked too complicated for a first go round.    It made far more than I thought it would.  Next time I will need to make them in a 9 x 13 pan.  (instead of three small round pans).

Ingredients:

1/2 cup milk
1/2 cup  sugar
1 1/2 tsp salt (can get away with less)
1/4 cup butter, melted
1/2 c warm water
2 pkg dry yeast
2 large eggs, beaten
2 cups flour (first amount)
up to 2 1/2 cup flour
additional melted butter for brushing on tops of baked rolls.

Directions:
  1. Scald
    milk (bring just to a boil and remove from heat immediately.(1 minute in microwave works too) Stir in
    sugar, salt, and butter. Set aside and allow to cool to lukewarm.  
  2. In a large bowl mix warm water and yeast. Stir until dissolved. Stir in
    lukewarm milk mixture, beaten eggs, and half the flour. Beat until
    smooth.
  3. Add remaining flour gradually, mixing as you go. You may need a bit more
    or less than the total 4 1/2 cups called for in the recipe, depending
    on the humidity and other factors. Your dough should be elastic and
    slightly stiff but not dry.

  4. Turn dough out onto a floured board and knead until smooth and very elastic. This usually takes 8-10 minutes.
  5. Butter the inside of a large mixing bowl. Put dough in bowl and turn
    dough over a couple of times to coat it all with the butter.
  6. Cover bowl and place in a warm place so it can rise. It will take about
    1 hour to double in bulk. At that time punch dough down and turn out
    onto a lightly floured board to shape.

  7. Pinch off about 2-3 tablespoons of dough and shape into a ball. Place
    each one in a buttered muffin tin or baking pan, barely touching each
    other, do not crowd rolls.
  8. Cover prepared rolls and allow to rise in a warm place until doubled in
    bulk, again about 1 hour. Rolls should now touch each other. (A little
    more rising will occur during baking.)

  9. Preheat oven to 375 degrees when rolls are about 10 minutes from being ready for baking.
  10. When ready to bake place rolls in oven and bake for 20-25 minutes. They
    should be browned nicely and smell so good and yeasty! Brush tops of
    rolls with melted butter immediately when removed from oven. Allow rolls
    to set for at least 10-15 minutes before eating.

 NOTE: if you make a ring…cook it for less time they came out a bit dark being in as long as the rest of the rolls. 

This post may contain affiliate links – using affiliate links from A Net in Time helps fuel this blog and our homeschool – thank you!

©2006-2017 A Net In Time. All rights reserved. All text, photographs, artwork, and other content may not be reproduced or transmitted in any form without the written consent of the author. A Net In Time/

Filed Under: Uncategorized Tagged With: bread, hands-on learning, recipes

Recipe: Scalloped Potatoes

April 18, 2017 By Annette1 2 Comments

My second time ever making scalloped potatoes.   I made some long past when we were first married, but our eating habits changed and I just haven’t made them again. 

Ingredients

  • 3 pounds potatoes, thinly sliced
  • salt and pepper to taste
  • 9 tablespoons all-purpose flour, divided
  • 6 tablespoons butter, diced
  • 1 quart whole milk, or as needed (I used about 3.5 cups)

Directions

  1. Preheat oven to 425 degrees F (220 degrees C). Grease a 9×13-inch baking dish.
  2. Arrange one layer of
    potatoes in the bottom of the prepared baking dish. Sprinkle the
    potatoes with salt and pepper, 3 tablespoons flour, and 2 tablespoons
    butter. Repeat layering 2 more times, until all of potatoes have been
    used. Slowly pour milk over the potatoes until the dish is 3/4 full of
    milk.
  3. Bake until the milk
    comes to a boil (check after 15 minutes), then reduce heat to 375
    degrees F (190 degrees C) and bake until potatoes are tender, 45 to 60
    minutes more.

 Results:

The lad: “mom!  These are good.  Thanks for cooking this”
Dad “: no onions hun?  But he finished the pot off much to my chagrin.
Mom “I like it, I should make these more often”

Filed Under: Uncategorized Tagged With: recipes

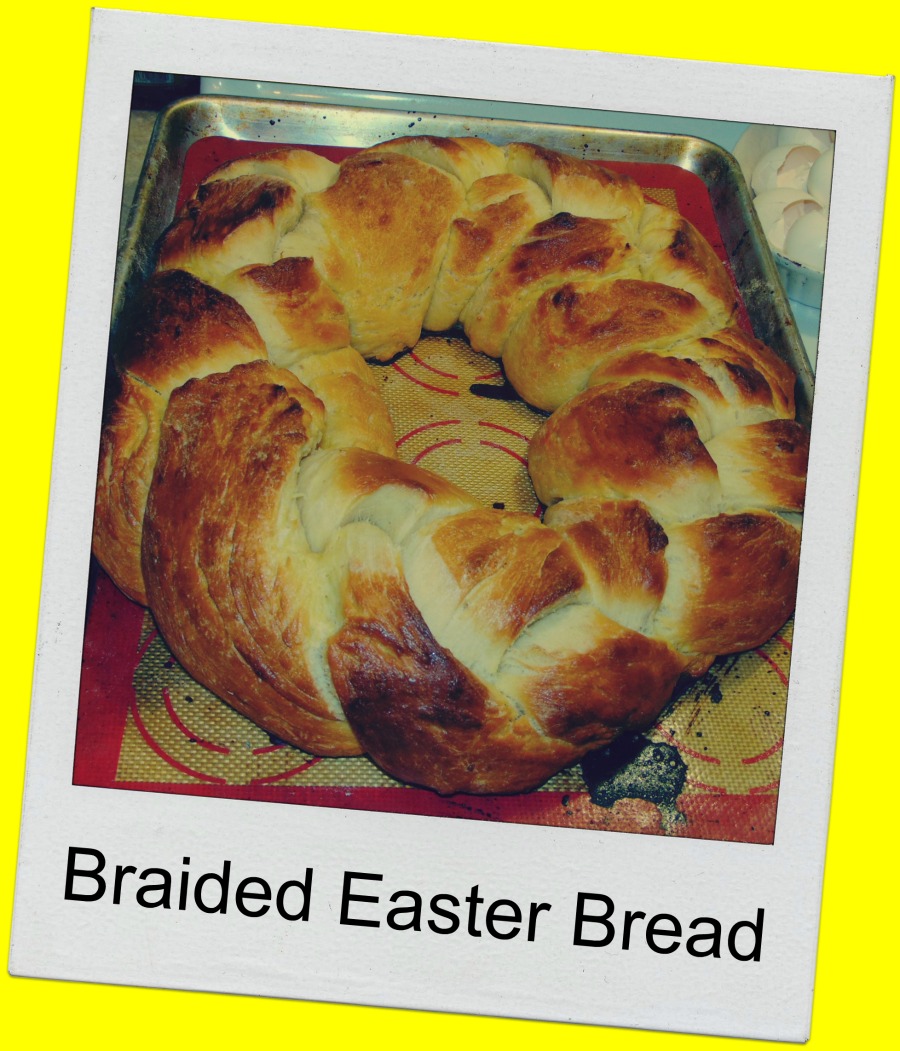
Recipe: Braided Easter Bread!!!

April 14, 2017 By Annette1 Leave a Comment

CHECK IT OUT!!!   Man, this was HARD to do.  I’ve never braided bread before so this was totally a new thing to try.  I figured since I was getting confident making bread that bumping my skills up a level might not be a bad thing to try and braided breads always look rather cool.

You can find the original recipe here: Braided Easter Bread.

Ingredients:

6 cup all-purpose flour

2 tsp baking powder

1 Tbsp sugar

½ cup warm water

2 Tbsp yeast

1 cup milk

¾ cup honey

1 Tbsp salt

2 Tbsp butter

zest of 1 orange

5 eggs

2 egg yolks

2 Tbsp water

1 Tbsp honey


Directions
1. Mix 1 tbs sugar with ½ cup warm
water and sprinkle in the yeast. Let sit until frothy, about 10 minutes.
Combine the 1 cup milk, ¾ cup honey, 2 tbs butter, 1 tbs salt &
orange zest in a sauce pot, bring to a simmer and them remove from heat.

2. In a large mixing bowl, whisk the 5 eggs
and then add the yeast mixture followed by the milk mixture. In a
separate bowl, mix the baking powder into the flour. Incorporate the
flour into the wet ingredients one cup at a time until the mix forms a
large wet dough. Place the dough in a large bowl that has been greased
with vegetable oil, cover with plastic wrap and leave to prove in a warm
place for 2 hours.

3. After the dough has proved, turn it out
on a floured work surface and knead the dough for 10 minutes, until the
dough is elastic. If the dough is too sticky, fold in a little more
flour.

4. Divide the dough into three equal pieces
and roll each piece into a long thread. Lay the three threads out about 2
inches apart on a greased baking tray. Pinch the three threads together
on one end and then braid them together, folding each thread over the
other, alternating as you go. When you reach the end, pinch the three
threads together. Brush the dough with vegetable oil, cover with plastic
wrap and let rest for 15 minutes. Set the oven to 375F.

5. Combine 2 egg yolks with 2 tbs water and 1
tbs honey and brush the bread with the egg wash. Let sit for 5 minutes
and then brush a second time.

6. Bake the bread in the oven at 375F until golden brown, for about 30 minutes.

My Struggles:

I couldn’t figure out how to roll the dough.  I think I had too much flour on it. But I couldn’t get it roll worth a diddle, as I ended up squeezing the dough into a long tube mostly.  There must be some trick to rolling dough… thoughts???
It also turned out way too long for the pan I have which is why I turned it into a circle. 
 
What did we think?
Well.. I’ll have to update this recipe later. We haven’t tried it yet as I made it for Good Friday.  🙂 
Though hubby’s response when he saw it was “wow…. looks good hun, smells good too!”, then “did you hide anything in it?” Silly fellow. 🙂

This post may contain affiliate links – using affiliate links from A Net in Time helps fuel this blog and our homeschool – thank you!

©2006-2017 A Net In Time. All rights reserved. All text, photographs, artwork, and other content may not be reproduced or transmitted in any form without the written consent of the author. A Net In Time/
Filed Under: Uncategorized Tagged With: Cooking, hands-on learning, holidays, recipes

  • « Go to Previous Page
  • Page 1
  • Interim pages omitted …
  • Page 7
  • Page 8
  • Page 9
  • Page 10
  • Page 11
  • Interim pages omitted …
  • Page 13
  • Go to Next Page »

Primary Sidebar

ABOUT ME

I am centered by the love of God and family. Smiles are brought about being a Writer, Poet, Hiker and reader. Growth occurs as I educate my son, raise him up in the fear of the Lord, love up on my critters and live as a pastor’s wife.

Want to Stay Informed?

Subscribe and I’ll shoot you an email once a week.


Thank you!

You have successfully joined our subscriber list.


Recent Posts

  • A Shift in Perspective
  • Affording Emergencies
  • Obey God Not Man
  • Just a Phase
  • What Route Should I Take?

Recent Comments

  • Annette1 on A Shift in Perspective
  • Annette1 on A Shift in Perspective
  • Sandra K. Stein on A Shift in Perspective
  • Tami on A Shift in Perspective
  • Annette1 on A Shift in Perspective

Archives

Categories

  • Art
  • Art Books
  • Blogging Helps
  • Faith
  • Homeschooling
  • Poetry
  • Recipes
  • Reviews
  • Uncategorized
  • Writing

Footer

Amazon Affiliate information

A Net in Time is a participant in the Amazon Services LLC Associates Program, an affiliate advertising program designed to provide a means for us to earn fees by linking to Amazon.com and affiliated sites

Tinker Crate Affiliate

Copyright © 2026 A Net In Time. All rights reserved. All text, photographs, artwork, and other content may not be reproduced or transmitted in any form without the written consent of the author. A Net In Time · Lifestyle Pro - Child Theme On Genesis Framework · WordPress · Log in